So You Want to be a Chef?

Wednesday, November 20

For the third year in a row I was invited to NAIT to be a guest judge at their 15th annual Toque Demagny Competition. This is an event that showcases the talent of the students of the Culinary Arts program, with a second-year student leading a first-year student as they prepare a three-course meal, featuring Alberta fare like fresh pickerel and wild game. The 12 teams compete for seven various scholarships awarded. It’s a great opportunity as a chef to connect with the young students, watch their progress, and provide feedback to the aspiring chefs. It’s the least I can do to help the organization that helped to set me on the right path in my career.


Throughout my time I have shared countless recipes and stories of events not to be missed, I have even shared the highlights of the Toque Demagny event, but in all that time I don’t think I have ever steered you straight about how to go about starting a career in this industry. What better time to help guide you in the right direction if you are considering making this a career.

First things first though, The industry is not all sunshine and lollipops.

If you value your social life this is not the career for you. Chances are the people you work with online will become closer than family because, quite frankly, you will spend more time with them then your family

If you enjoy the holidays this career isn’t for you. While your family is cuddled around the fireplace after dinner you’ll be slaving over the stove for everyone who doesn’t want to cook at home.

If you have aspirations of great wealth and fame this is not a career for you. For every wealthy chef there are a 100,000 chefs living just above the poverty line.

If you can’t handle stress this job isn’t for you. The constant pressure of deadlines, labour goals, food cost targets, customer satisfaction, and just the day to day stress of working on line in a kitchen can wear a person down.

Don’t have a thick skin? Then this isn’t the career for you. Chefs tend to be the most blunt, crass, and harsh people you will meet. Sure, some of us have softened, but the persona of Gordon Ramsey is not that far from reality.

The first thing I would encourage anyone considering this field as a career to do is to is to find a restaurant they respect and reach out to the chef. Once you talk to the chef and decide to soldier on, offer to volunteer your time in his kitchen. I know it may sound crazy, but it is imperative to immerse yourself in a real kitchen for a period of time before you sign up for school, wasting time, money, and perhaps even taking the spot of someone with more desire to pursue this as a career than you. While talking to the chef be sure to inquire about what you can be expected to learn and ind out just how much they actually prepare from scratch. If you have dined there and done a little homework it should be quite easy to tell how much is made fresh in house. That’s important, because going to a restaurant where you simply reheat convenience foods is not going to give you a true indication of what this career is all about. Most chefs will jump at the opportunity of free labour, just don’t get sucked into being his lackey or errand boy, doing all of the less than desirable jobs in the kitchen. Don’t kid yourself either though, chances are you won’t be breaking down a whole pig or preparing consommé from scratch on your first day. There will be a certain degree of paying your dues that will be required.

In my experience people will either quickly fall in love with the intensity, pressure and excitement of a kitchen, or they will run like the wind. If you manage to last your trial period and enjoy the trade then it’s time to pursue an education. There are two traditional routes you can take. The first is to take a full-time culinary arts program. This is typically a two-year program requiring your full commitment, leaving little time to work while going to school. The benefits of this program are enormous as the education is extensive. It has been my experience that most students who graduate from this have a strong fundamental understanding of the classic cooking techniques.

The second option is the apprenticeship program, T a three-semester program that requires eight weeks in the classroom, followed by 10 months in a kitchen. The skills are only touched upon in school and the expectation is for the student to retain the required skills while in the field. If working with the right chef and learning the fundamentals this can be a beneficial route to take, as the hands-on practical experience can’t be beat, but you need to be working with a chef willing to fully commit to your success. Don’t settle for a kitchen where you are not growing!

My experience with students from the two programs is that the culinary arts students are very book smart and have a broad knowledge base, whereas the apprenticeship students are far less book smart, but are more ready for the reality of a high paced kitchen.

Either way, I would encourage all who are interested in this field to complete their education and to pursue their journeyman’s certificate and red seal.

And you don’t have to travel far to pursue either of these options. NAIT offers both of these programs and is one of the most well equipped culinary schools in the country, along with some of the most talented and committed faculty. They offer wonderful culinary competitions and have taken Team NAIT to compete against some of the world’s best chefs, bringing home stacks of medals and trophies along the way. Due to the generosity of great community support they are also able to host fantastic Chef in Residence programs where the young students can work with and learn from famous celebrity chefs like Rob Feenie, Chris Cosentino, and Susur Lee, while they attend the school.

Once you have your ticket, the world is your oyster. You can find work anywhere and pick up new skills at every stop along the way.

Here We Grow Again!

Thursday, November 14

Here we grow again! After what has felt like an exhausting several months of building, we are in the final days of preparation on our newest location, The Parlour Italian Kitchen & Bar. The truth is, though, that the hard work has only begun. Anyone who has built a restaurant, or a business of any sort, from nothing knows the long days and often sleepless nights that comes with it. It starts with a vision, an idea, an opportunity to fill a need in your community. Once the idea has passed the stink test and we are certain it’s viable then it’s time to begin the development. It starts with the restaurant design, answering countless questions and researching endless other concepts and designs for inspiration.

Once the fabric for the booths, the colour of washroom tiles, and the pattern on the lampshades is sorted out, it’s time for me to make the most with the remaining kitchen space. Every detail has to be taken into consideration, the size of the space, how many seats, the style of cuisine how many inches of space between the cooking equipment and the plating area. If one thing is overlooked it can make for a costly and painful redesign down the road. The kitchen needs to be built for speed, efficiency and ease of use.

Then all of the finer details need to be sorted out. Which cutlery will we use? What set of plates suit the décor and concept best? What uniforms will the staff wear? What color tablecloths will we use, or will we even use any at all?

After all of the preparation, designing and building is done there is a brief moment, call it the eye of the storm, where we have a chance to reflect, to take stock of what we have accomplished and savor it. That moment is fleeting, because as exhausting and stressful as the process of opening a restaurant is, the real work begins when the doors swing open for the first time. That valuable point can be lost on so many entrepreneurs.

All of the work involved in creating and developing a new business is exciting and fun. The long hours and continuous stress don’t seem so bad because we are entrenched in the process of our vision coming to light. So many entrepreneurs figure the job will get easier once their business is open, but the hard truth is quite the opposite. Once the glow of your business wears off there is nothing left but the reality, the day to day grind of business. If you have built a business that your community is in need of or eagerly anticipates you will have no issues filling the seats once you finally open. Everyone will want to try you out at least once, test the water, see what your business is about, but nothing guarantees their return. It’s up to you to create a unique and memorable experience to keep them coming back. Having a good opening is no guarantee that your business will be successful in the long term either. As an owner you can never let off the pressure and never relent. There is no room for bad days as now, more than ever, people can be unrelenting. Blogs and social media sites can ruin your reputation before you even have a chance to react. Being an entrepreneur, and especially a restaurateur, is not for the faint of heart, or the light of pocket. Over 25% of independent restaurants close within their first year, and that stat jumps to nearly 60% by the end of year three.

So, in light of our newest Italian venture I share with you a simple recipe for a panzanella salad, a dish that is indicative of most Italian cuisine in its simplicity. This Tuscan salad, traditionally consisting of stale bread and onions is now more commonly made with tomatoes, but can also include an array of ingredients. I like to put it together using what I have available at hand, but this recipe is a good starting point. Add in a few of your favourite items to make it your own.

Panzanella Salad

Prep Time: 10 minutes

Feeds” 3-4 people

1 day old ciabatta bun

3-4 Tbsp. extra virgin olive oil

2 large vine-ripened tomatoes

2 balls of fresh mozzarella

¼ red onion

½ cup your favorite olives

4-5 leaves fresh basil

¼ cup balsamic vinaigrette

Salt and pepper to taste

Chop the bread into large chunks or cubes

Heat a pan to medium heat

Place the olive oil in the pan, followed by the bread, tossing on medium heat to lightly toast, 3-4 minutes

Chop the tomatoes into large wedges

Tear the mozzarella into smaller pieces

Cut the red onion into rings

Pit the olives

Tear the basil into pieces

Place the ingredients in a bowl and drizzle with vinaigrette, season and stir to combine

Place on a platter to serve

Enjoy!

The Perfect Beef Wellington

There are few pleasures in life that I enjoy more than the opportunity to play, get creative and take liberty with classic dishes.

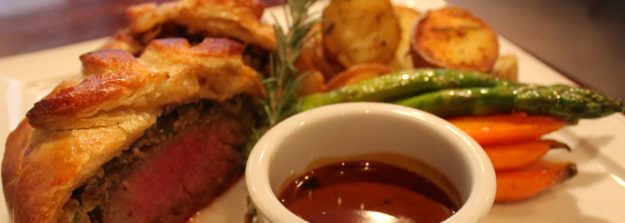
Sometimes though, a dish is so good in its classic form that it deserves the respect of leaving it as is. One such dish is Beef Wellington. The combination of tender roasted beef filet, topped with mushroom duxelle and foie gras pate, all enveloped in delectably flaky puff pastry is so perfect that it really doesn’t require any manipulation.

So when a follower reached out through social media asking for me to share my recipe for beef wellington I felt obliged to share, but I will be the first to admit my recipe probably won’t stray all that far from the traditional recipe from decades ago.

There are four basic elements that make up every wellington dish and they are the puff pastry, the beef tenderloin, the mushrooms, and the foie gras pate. Each element brings its own unique addition to the flavour party that happens with this dish.

Let’s start with the puff pastry. This ever so delicate and flaky pastry is the pinnacle of pastry dough. It requires a high degree of skill and a fair amount of patience to prepare. The process involves layering fat, preferably butter in between the layers of dough. The dough is then rolled out and folded, rested, turned and then repeated. This principle creates several thin layers of dough separated by fat. When cooked the water trapped in the layers of fat create steam, separating each layer, creating a light and flaky dough.

If you want to attempt the daunting task of making your own puff pastry from scratch, by all means, go ahead. I won’t bore you with the step by step instructions of how to put it together yourself, but I have shared a link to Martha Stewart’s recipe with detailed instructions. Who better to teach you after all.

http://www.marthastewart.com/349987/puff-pastry

If you don’t want to strain through the painstaking process of making it, there is no shame in buying it, just take the time to find a frozen product made with butter rather than margarine or shortening. It is far superior product, with a nice delicate flake and better flavour. Make sure to take it out of the freezer and temper it about 20-30 minutes prior to kneading it.

There is no room for shortcutting with the beef, as this will be the star of the dish. Use only tenderloin. I recommend using at least a AAA quality steak, with great marbling, but my preference is to use Heritage Angus Beef, because not only is it well marbled, but it is hormone and antibiotic free.

When it comes to the mushrooms, there’s not much to it. Some chefs use portabellas and other use criminis. My preference is to use a standard button mushroom. Take the time to chop the mushrooms fine by hand. It’s good practice for your knife skills!

The final element is where I tend to stray the most. Most classic recipes call for foie gras pate. I prefer to slice off a generous slab of foie gras and lay it right on top of the beef and let the goodness melt right in.

Now that we have broken this classic dish down, let’s get to work with the recipe. Keep in mind I am doing this recipe based on having your puff pastry ready for you

Classic Beef Wellington

Prep Time: 30 minutes

Cooking Time: 30 minutes

Feeds: 4 people

1.5 lbs. centre cut beef tenderloin

You have two options here, you can do 4 individual 6 oz. portions or prepare it whole and slice once roasted

2 Tbsp. canola oil

2 cups button mushrooms

2 Tbsp. shallots, minced

1 Tbsp. garlic, minced

1 tsp. fresh thyme, chopped

4 Tbsp. clarified butter or canola oil

4 oz. foie gras, deveined and sliced thinly into four

2 Tbsp. Dijon mustard

2 eggs

¼ cup milk

12 oz. puff pastry, or one large sheet if serving whole

Salt and pepper to taste

Mince the mushrooms into a small dice

Place a pan on medium heat, melt the butter, add the shallots and garlic and sauté, then quickly add the mushrooms and sauté

Season with salt and pepper, finish with fresh thyme and set aside to cool

Crack the eggs into a bowl with the milk, whisk vigorously to combine

Ensure the beef is cleaned of all excess fat and silverskin, if choosing to serve in separate portions cut into four even sizes

Heat another pan to high heat

Season the beef on all sides with salt and pepper and sear in the hot pan on all sides

Set aside to cool

Roll out the puff pastry to about ¼ inch thick, lightly dusting with flour to ensure it doesn’t stick to your work surface, consider whether you are using individual portions or a piece. This is no different to wrapping a present, you will need your pastry portions to be large enough to completely envelope the beef

Using a pastry brush, lightly brush the beef with the mustard on all sides

Spread the mushrooms out on the bottom of the centre of the puff pastry, then add the foie gras, and lastly, place the beef

Brush all of the exposed puff pastry with the egg wash and then begin to fold up like a present, slice away any excess pastry with a paring knife

Place the beef on a baking sheet, lined with parchment and refrigerate until the pastry dough is firm and cool again, at least 15-20 minutes

Preheat the oven to 425F

Remove the wellington from the fridge, using a sharp knife gently place several thin slits along the top of the pastry to allow the steam to be released from the wellington as it bakes

Brush the top of the wellington with the egg wash and place in the oven to bake

Bake until medium rare in the centre, about 20-25 minutes, but I HIGHLY recommend using a meat thermometer and cooking it to 135-140F internally

Remove from oven and let it rest for 3-5 minutes, and then slice in half to serve

I like to serve this with some roasted potatoes and a green peppercorn jus, but I have seen it served with just about everything!

Who’s hungry?


Sweetening the Auction Pot

Sunday, November 3

What a whirlwind week it has been! After seemingly countless hours planning and preparing for Edmonton’s premier culinary competition, Gold Medal Plates, we were rewarded for our efforts by topping the podium. I am so grateful for this good fortune and thankful for the great people around me that helps us achieve this goal.

This victory only further helps to sweeten the pot for our ATCO Edmonton Sun Christmas Charity Auction. If you haven’t heard yet I have partnered up with Breakfast Television’s Ryan Jespersen and Up! 99.3’s Kari Skelton for an unforgettable afternoon and evening. Your group of eight will be transported by River City Limousine to Bliss Yoga Spa, where the four ladies will join Kari in experiencing the Sacred Nature Ritual full body exfoliation, massage and facial, followed by a pedicure.

Meanwhile, the gentlemen will join Ryan and Chef Paul for a guided trip through a local farmers’ market to gather fresh ingredients for a private cooking class. Once spa services are complete, the ladies will be transported by limousine to your choice of LUX Steakhouse or The Parlour to enjoy the fruits of the men’s labour, paired with wine. At the end of the evening, your group will enjoy a ride home by limousine. Maybe the fact that I’m a gold medal winner might fetch us a few more bucks for the four very worthwhile charities.

Click here to see the great auction items.

The auction opened Tuesday, but there is still time to get your bid in, as it closes on Oct. 31, at 7:00 p.m. Be sure not to miss this great opportunity.

Now that I’ve got the shameless plugs out of the way, let’s talk food. With the exhausting week behind me I wanted nothing more than a very simple, but delicious meal for my family and I to enjoy this weekend.

When I think simple and delicious I think of roasting pork. My automatic go-to for pairing with pork is apples, and there is hardly a better time of year to enjoy apples. So rather than simply roasting a pork loin I decided to grab some tenderloins, some delicious Fuji apples and some sweet mission figs. Here is what I came up with.

I hope you enjoyed it as much as my family did.

Prep Time: 30 minutes
Cooking Time: 15 minutes
Special Tools: boning knife, butcher’s twine (optional)
Feeds: 4
2 pc. whole pork tenderloin
8 slices prosciutto
1 tbsp. butter
2 Fuji apples
1 cup dried Mission figs
2 tbsp. fresh sage
2 tbsp. brown sugar
1 tbsp. apple cider vinegar
Salt and pepper to taste
2 tbsp. canola oil
-Peel the apples and chop into small dice.
-Chop the figs into small dice.
-Heat a pan to medium heat.
-Place the butter in the pan.
-Add the apples and sauté one minute.
-Add the figs and continue to sauté.
-Add the brown sugar, followed by the vinegar.
-Saute until the sugar is dissolved and the apples have caramelized slightly.
-Add the sage, season and stir to combine.
-Remove from the heat and place flat on a plate to cool quickly, refrigerate if necessary.
-Meanwhile, while waiting for it to cool we can prepare the tenderloins.
-Start by removing any silver skin and any excess fat.
-Then, you have two options: the first option is to butterfly the loin lengthwise. This involves slitting the loin in half lengthwise, but keep it intact, then slitting it open again to create an even 1/2 inch thick flat loin. This method requires a fair amount of knife skills and the ability to truss the loin once stuffed.
-The other option is to use your thin boning knife to insert it into the centre of the tenderloin from one end and give it a twist to create a pocket for stuffing and then repeat on the other end.
-This is my preferred method because it is a fair amount easier to do and requires less work tying the loin up afterwards.
-Either way you choose to do it you now need to stuff the loin.
-If using the first method lay half the stuffing throughout the centre of the flat loin and roll it over to pack in all of the stuffing.
-If using the second method you will need to slowly push the stuffing into each end of the pork loin, using your thumb to work it into the centre from both ends.
-Season the pork tenderloins with salt and pepper on all sides.
-Once the pork is stuffed it’s time to wrap the pork with the prosciutto.
-Lay three slices of prosciutto side by side lengthwise and then place the loin on one end.
-Roll the prosciutto slices around the pork, packing it tight.
-You can either truss the pork with the butchers twine (look for a demo video online if you need help, and I highly recommend it if you used the first stuffing method.) or you can wrap the pork in plastic wrap very tightly, setting it aside in the fridge for 15-30 minutes to help the prosciutto to adhere to the pork.
-Once ready, preheat the oven to 400F.
-Preheat a pan to medium high heat.
-Place the oil in the pan and then add the pork.
-Sear on all sides and then place in the oven to cook until medium well, about 10-12 minutes.
-Once cooked, remove from the heat, allow to cool and rest 4-5 minutes and then slice.
-We served this with some roasted potatoes, butternut squash and some brussel sprouts, but choose your favourite accompaniments.


Who’s hungry?

Things I’m Thankful For

Tuesday, October 8

With the arrival of October and the fall harvest just about complete we take the time to give thanks for the things we are grateful for. We restaurant folk have a tendency to become a little bit jaded when it comes to holidays. It usually just means that we get to spend even more time strapped to the stove or catering to the needs of others while our families and friends enjoy long weekends, away from work, with their loved ones, wondering why we can’t join them. Unfortunately we can’t be there because that’s not the path we chose. When we chose to make this a career we knew it meant giving up holiday meals with family and weekends away from the city with friends. It’s one of the many sacrifices of our chosen career. In fact, for most young chefs the long weekend just adds more stress to an already busy life. Not only do we have to cope with busy restaurants and ensuring that our guests are well taken care of, we also have to try to squeeze in a trip to the parents for a quick dinner, usually having to ask them to eat around your schedule. Even worse, we have to miss that time away from our family and be left with the guilt of letting them down for not being around. Early on in my career it didn’t bother me all that much. It was just another meal and I would have a plate of leftovers when I got home. Things change though as you grow up. Now that I have a family of my own it makes it that much tougher to consider not being at the table with my family. So, this year, rather than being jaded and resentful I have chosen to find the positive in the situation and make the time for my family, and be thankful for all that I have in my life.


This year I find myself particularly thankful for so much. I have a loving wife, beautiful family and daughter that I adore. I am blessed to be where I am at in my culinary career and that is in great part to the exceptional staff I have around me. We continue to grow our business and, with that, our family of talented chefs continues to grow as well. I live in a wonderful city that continues to grow and boom, virtually isolated from the continuing economic struggles that a great deal of the world has faced. Sure, I could complain about the short summers, or the potholes, or taxes, but those just seem like first world problems, and the truth is no one wants to listen to that. I have a roof over my head, food on my table, and am in good health, relatively speaking. What more could a guy ask for really? Sure, everyone in the world wants more, but the truth is, if we have those basic things, we already have enough. So this year I choose to be thankful for where I am and mindful that my life could be a whole lot worse.


Enough already, you probably don’t want to hear about a middle-aged chef rant about all of the things he is thankful for, you’d probably rather hear about what I’m cooking this week, or at least I hope you do. So, with Thanksgiving this weekend I thought I would share a recipe for a delicious side dish. Sure, I could offer some turkey recipes, or a tip for moist stuffing, but I thought I would keep with the original tradition of the holiday, paying thanks for the bountiful harvest by creating a feast, and what better harvest ingredient that screams fall then the yam? This dish is so good and tastes like candy, so you might even get the kids to eat their vegetables.


Yam Casserole


Prep Time: 45 minutes

Cooking Time: 30 minutes

Feeds: 8-12 as a side dish

Special Tools: an approximately 8” by 8” casserole dish helps, and so does a food processor, but neither is necessary


4 lbs.              yams, peeled, about 3-4 large ones

½ cup                        sugar

¼ cup             maple syrup

1 tsp.              vanilla bean paste (or extract if necessary)

2 ea.                eggs, whisked

½ cup                        butter

1 tbsp.            chipotle paste

¼ tsp.             cinnamon

TT                   S&P


For the topping:

1/3 cup          flour

1 cup              brown sugar

1 cup              chopped pecans

¼ cup             melted butter


  • Chop the yams into large cubes, similar to if you were preparing mashed potatoes
  • Place the yams in a large pot and cover with cold water, salt
  • Place the pot on the stove and bring to a simmer
  • Allow to cook through, until fork tender, but not overcook to mush, about 20 minutes
  • Remove from the heat and drain thoroughly
  • If using the food processor, place the yams in the food processor and puree in batches, adding the sugar, maple syrup, butter, eggs, and seasonings bit by bit
  • Once all batches are pureed ensure that they are all blended well so that the mixture is evenly seasoned
  • If mashing by hand, use a potato masher and mash until fairly smooth, then add the remaining ingredients and whip until smooth and flavors are evenly distributed
  • Place the yam puree in the bottom of the casserole dish, layering it about 1 inch thick
  • In a bowl combine the topping ingredients and mix until evenly combined
  • Place the casserole dish on a baking sheet to avoid any mess or spillover during cooking
  • If you don’t have a casserole dish feel free to use pretty much any baking pan similar in size
  • Layer the topping over the yam puree, refrigerate until ready to bake
  • Everything up to this point can be done in advance, saving you the mess during the big day
  • Preheat the oven to 350F
  • Place the casserole in the oven and bake until warm through and nicely browned on the top, 30-35 minutes
  • Serve immediately


Happy Thanksgiving everyone!


Delicious Balls of Goodness

Friday, October 4

Trends in the restaurant world come and go.

In recent years we have seen buzz words like nose to tail, farm to fork and eat local get beaten to death. We have seen the resurrection of the lost art of charcuterie, and things like pork belly had their moment in the spotlight.

One trend that seems to have hit the scene in the past year or so would be the rise of the arancini. The humble ball of rice that dates back to 10th century Italy has made it’s way back into the mainstream, landing on menus more frequently. Today’s arancini is most often prepared with risotto rice and can be filled with just about anything under the sun. Then they are breaded and deep-fried.

My first experience with them was thanks to one of my most talented sous chefs, Tony Le. He prepared a delicious interpretation of them, featuring fresh lobster and spring peas as a special treat for my wife and I to enjoy at our wedding reception. I have to say it was love at first bite. Ever since that day I have been playing with different variations of them for special events, hors d’oeuvres, and VIP guests. They are so simple and fun, but can pack a real wallop of flavour.

They have even become so popular that we have developed a small cult following on twitter of guests that love to come in for them. Every time we know these guests are coming in we put together a different arancini for them to start their meal off. Just last week I actually had to “talk” one of our great ambassadors through the process of making risotto for the first time. It wasn’t until I had to do it 140 characters at a time that I realized just how overwhelming the prospect of making these delicious little bites could be for someone who is unfamiliar with the process. So, this week, I share with you my take on Chef Tony’s creation. Keep in mind that anything you can enjoy in risotto, you can make into risotto balls.

Lobster and Green Pea Arancini with Saffron Oil

Prep Time: 30 minutes

Cooking Time: 30 minutes

Inactive Cooling Time: 60 minutes

Prepares: About 40 arancini

This dish requires three unique steps that all require a fair amount of skill and a little bit of attention to detail. I will try my best to walk you through it step by step, keeping it as simple as possible for you. As far as the stock to use for the recipe there are a few options. We at the restaurant prepare lobster stock for our lobster mac n’ cheese, so we use that when making these. Preparing a lobster stock from scratch can require some work, and it can also stink up your house, but if you are up for the challenge then you could buy whole lobsters, use the meat to fold into the risotto and make the shells into a stock. If you aren’t feeling up to all of the extra work, you can simply use a light fish stock, or even a light chicken stock, if all else fails.

1 large shallot, minced

4 Tbsp. butter

2 cups Arborio rice

1/4 cup white wine

3 cups stock, lobster, fish or if need be, chicken

1 cup green peas, fresh if you can, frozen if you have to

8 oz. cooked lobster meat

1 cup parmesan

¼ cup raw butter

Salt and pepper to taste

6 eggs

½ cup milk

1 cup flour

5 cups panko bread crumbs

Salt and pepper to taste

Pinch saffron threads (about 8)

½ tsp. hot water

½ cup mayonnaise

1 garlic clove, minced

1 tsp. Dijon mustard

1 Tbsp. extra virgin olive oil

1 tsp. lemon juice

Salt and pepper to taste

1 parmesan, for shaving for garnish

First, we must begin by making a risotto

Place stock in pot and bring to a simmer

Meanwhile, place another medium sauce pot onto medium heat

Add the 4 Tbsp. of butter and melt, then add the minced shallot and sauté until translucent, but do not brown

Quickly add the Arborio rice, and stir to coat the rice with the butter

Deglaze with white wine, allow to reduce

Now, this is where it gets a little tricky, add the stock, ladle by ladle, while continuing to stir as you go

Allow the rice to absorb the stock, and then add some more, do not add it all in at once, this is referred to cooking rice using the risotto method

Be gentle while stirring, the combination of the starch from the rice, and the stock will create a natural creaminess to the dish

As the rice gets closer to being cooked add less and less stock each time, to ensure that you don’t end up having too much stock when your rice is the right texture, what’s the right texture you ask? Just like pasta, it should be cooked al dente, or to the tooth, but in this case, because we are going to cool it down, and then cook it again when it is fried, we will cook it about one minute less

As you approach the perfect texture fold in the lobster meat, followed by the fresh peas

Lastly you will fold in the grated parmesan and the raw butter, stirring until it’s melted and combined

Now, quickly spread the risotto out onto a parchment lined baking sheet and refrigerate to cool and stop the cooking

Once the risotto is completely cooled it is time to start forming it into the balls, you can use a small ice cream scoop, or simply form one inch round balls by hand

Now it’s time to bread them, to do so you will need to prepare a breading station, using three bowls

n the first bowl place the flour and season it

In the second bowl, combine the eggs and milk, season and whisk together

In the third bowl place the panko bread crumbs

Lastly, set up a tray to place the breaded risotto balls onto

Now, keeping one hand clean, one by one place the risotto balls in the flour, rolling it to cover it, then dust it off and place in the egg mixture, dripping it off, and then lastly into the bread crumbs, coating all sides evenly

Place it on the tray and repeat with the remaining risotto

At this point the risotto balls can be refrigerated for up to one day, but can also be frozen for up to one month, and then fried right from frozen

Time to whip up a delicious saffron aioli to enjoy these tasty treats with!

Place the saffron threads in small bowl and add the hot water

Allow to stand for 5 minutes

Add the remaining ingredients to the bowl and whisk to combine, adjust seasoning and refrigerate until ready to serve

All of the hard work is done, now it’s time to put everything together!

Preheat the deep fryer to 335F

Place the arancini in the fryer batch by batch, being sure not to overcrowd the fryer

Fry until golden brown and hot all the way through, about 3 minutes

Remove from the fryer and place on a paper towel lined dish, season

To serve, smear the plate with a streak of saffron aioli and then place the aracini on top

Grate some fresh parmesan over the risotto balls and serve while still hot.


A Little Motivation from the Market!

When it comes to creativity chefs are a lot like musicians, artists and writers. We go through waves of inspiration, where we find ourselves keeping a pen and paper bedside for those middle of the night moments of inspiration. The ideas just seem to flow one after another and it feels like it will never end. Then it does. As though someone turned off the tap the ideas run dry.

I don’t know how starving artists or writers work their way out of a creative rut, but when it comes to me, I tend to eat my way out of it. I know, tough thing to have to do eh! Sometimes it can be as simple as getting away from the mundane of making the same old dishes. This can involve heading into the walk in cooler and grabbing a few ingredients and making something different for lunch. Just working with the same ingredients, but taking them in a whole new direction can really get the creative juices flowing. Sometimes that isn’t enough though. There are times where a little more injection of creativity is required. I have found myself at the Italian Centre or Lucky 97, trolling the aisles, looking for ingredients I haven’t worked with before,

I remember afternoons where I came back from “foraging” at various local shops with bags full of new ingredients. I’d then spend the afternoon experimenting.

Some things would be smashing successes and other times there would be horrific failures, but it always fun to test my skills and broaden my culinary horizons.

Without a doubt though, probably my favourite way to get inspired is to walk into one of our local markets at this time of year. Talking to our local purveyors, getting to know their story, and learning about what makes their product special always gets my blood flowing. This past weekend I did just that. When I first went to the market I wasn’t sure what I would put together for a recipe this week, but as I walked around I began to think of some of the best flavours this time of year. I began to think of the natural sweetness of Taber corn. It instantly made me think of scallops. Then I began to think of what could bridge the two ingredients together, and then it hit me as I walked by Irvings Farm Fresh. Bacon would be the perfect ingredient to bridge these two delicious items. I then decided to lean more towards creating an earthy scallop dish, and was inspired to prepare a hash using the incredible looking mushrooms from Mona’s. With the staples in hand I made my way back to restaurant. Along the way I was reminded of a delicious butter sauce I used to prepare years ago that would work perfectly with the scallops, bacon and the corn. Just like that a dish was born. I hope you enjoy trying it as much as I enjoyed the process of putting it together. The next time you’re in a rut, head to the market, or even your neighbourhood grocery store and let the flavours of the season inspire your next meal!

Seared Scallops, Taber Corn & Forest Mushroom Hash, Whiskey Beurre Blanc

Prep Time: 20 minutes

Cooking Time :20 minutes

Feeds: 4 people

12 U15 scallops

4 Tbsp. clarified butter, or cooking oil

1 Fresh Taber corn

2 slices bacon

½ lb. fresh wild mushroom nix (Mona’s Mushrooms)

½ leek

1 tsp. minced garlic

1 tsp. fresh thyme

2 oz. white wine

2 oz. whiskey

½ cup raw butter, cubed, cold

1 tsp honey

Salt and pepper to taste

Chop the two slices of bacon on the biased

Remove the stems from the mushrooms, rinse, and chop into bite sized pieces

Remove the husk from the corn, cut in half, then stand flat and slice the corn kernels off the cob

Cut away the greens of the leek, then slice lengthwise down the middle, rinse thoroughly, then cut on the biased

Remove the abductor muscle from the scallops, pat dry to help ensure a nice sear

Place a medium sauté pan on high heat

Add one Tbsp. of clarified butter or cooking oil into the pan, followed by the sliced bacon, sauté until cooked, but not crispy

Then add the corn, garlic and leeks and sauté 2 minutes

Add the mushrooms and sauté another 2 minutes

Add the fresh thyme and season

Preheat the oven to 300F

Meanwhile, heat a small sauté pan to high heat

Season the scallops with salt and pepper

Place a tbsp. of cooking oil in the pan and then sear the scallops four at a time, allowing each side to brown lightly and caramelize, about 1-2 minutes per side

Place the seared scallops in a heat proof pan and hold in the oven while you cook the rest of the scallops

Once the scallops are seared, make the butter sauce

Deglaze the frying pan you cooked the scallops in with white wine over low heat and let it cook down to a light syrup

Then deglaze the pan with the whiskey, being careful if using an open flame, as the alcohol can flame up

Allow the whiskey to cook down to a light syup, about 25% of it’s original volume

Now add the cold raw butter, one cube at a time, on the heat, while whisking vigorously

You are working to create an emulsion, so slowly add the butter while whisking to create a creamy butter sauce, if it looks greasy and thin, rather than creamy, you have likely split the sauce and need to start over

Finish the butter sauce with a touch of honey to soften the sharpness of the whiskey and season

To serve, place 3-4 tablespoons of the mushroom hash on each plate, top with 3 scallops and finish with a couple of generous spoons of the butter sauce

Who’s hungry?

Preserving the Vegetable Garden

There is nothing more satisfying then heading to the garden to pick something fresh for dinner. The taste of a tomato fresh from the vine, sprinkled with a dusting of salt and a drizzle of olive oil just can’t be beat.

I know my 16-month-old daughter would agree. If I turn my back in the yard for even a moment, I am guaranteed to find her in the tomato plants, plucking the ripest looking one and eating it like an apple. Around our house we thoroughly enjoy every chance we get to take advantage of eating from our garden. From mid June when the first of the radishes and lettuces arrive, all the way until the last root vegetable is plucked in the fall, we really try to make the most of it. Sadly, though, it tends to be a case of feast or famine. When something is ripe, we can’t seem to eat it fast enough, sharing with friends and neighbours in an attempt to ensure nothing goes to waste. Before we know it though, it’s past its prime and we are forced to wait another year to enjoy the ultimate in local flavour.

A prime example of that this year would be our tomato plants. I don’t know what we did differently or if it was the weather, but my plants were the size of small trees, and I have managed to yield over 50 pounds of delicious tomatoes from only three plants. Despite the efforts of our hungry little lady, and eating tomatoes around the house morning, noon and night, we still can’t keep up. So we had to improvise, get creative. It started simple, preparing fresh tomato salsa, and then we began adding them to pasta dishes, stewing them for sauces, and even canning them to save for winter. This past weekend I even pulled out an old favourite that I hadn’t made in years, preparing a delicious tomato caper relish, to be served with fresh fish.

That’s what is so fun about cooking, getting inspired by quality fresh ingredients and putting together a wonderful meal. Try this tasty recipe that is sure to help you use up some of your garden ingredients and leave you wanting more.

Pan Seared Black Cod w/ Tomato Caper Relish

Prep Time: 30 minutes

Cooking Time: 30 minutes

Feeds: 4 people, with some extra relish to spare!

This is a great little dish that can be served with a creamy risotto, some quinoa, or even some rice pilaf. I also like serving it with halibut or even snapper. The relish also works very well on a fresh tuna salad or a sandwich. I have even served this with grilled chicken or tossed into a seafood pasta. It is very versatile and can allow you to enjoy the sumptuous taste of garden fresh tomatoes well into the winter season.

1.5 lbs. fresh black cod filets

¼ cup flour

4 Tbsp. canola oil

2 Tbsp. butter

Salt and pepper to taste

12 large tomatoes, vine ripened

1 red onion

½ cup capers

¼ cup caper juice (great way to use the whole bottle!)

1-2 Tbsp. sugar

2 Tbsp. tomato paste

1 clove garlic

¼ bunch flat leaf parsley

First, let’s begin by preparing the relish! To do so, we must peel the tomatoes

Place a medium pot of water on to boil

Prepare an ice bath

Using a sharp paring knife, remove the core of the tomatoes, then turn the tomato over and score the skin by lightly slicing an X through it

Place the tomatoes into the water to soften the skin, this will take about a minute

Quickly remove the tomatoes from the pot and place them in the ice bath to cool them

Using the back of your paring knife gently peel away the skin of the tomatoes

Now quarter the tomatoes and large dice them

Large dice the red onions

Mince the garlic

Chop the parsley

In a medium pot heat the capers, caper juice, onions, garlic

Add the tomatoes and bring to a simmer, then add the tomato paste

Adjust the sugar, you are looking for a slightly tart, pickled tomato relish, but a little bit of sugar is required, not so much to make it sweet, but to take the tart edge off.

Adjust the seasoning and simmer for 8-10 minutes

Remove from the heat and allow the relish to cool

Once cool add the flat leaf parsley

Set aside enough of the relish for your meal and then preserve the rest by canning it. If stored in a cool cellar, it will last well through the winter

Now for the fish!

Preheat a non stick pan to medium-high heat

Portion the filets into roughly 6 oz. portions, ensuring all bones are removed

Pat the fish dry

Season the fish well on all sides

Lightly dredge the fish in flour

Place the oil and butter in the pan, followed by the dredged fish

Cook until golden brown and then turn over, 2-3 minutes

Repeat on the second side

Remove from the pan and serve

Top with tomato caper relish and enjoy!

Who’s hungry?


Game Day Snacks!

As we settle back into our fall routines and bid farewell to another summer it’s not all doom and gloom. With the changing of the foliage and a chill in the air there are some good things to look forward to.

For sports fans it means that we are approaching one of the best times of year. Just last week the first NFL regular season games were played and we are less than three weeks away from the launch of another NHL season, which means we can get back to Canada’s favourite national pastime, spending Saturday nights and Sunday afternoons sitting on the couch with friends, glued to the TV, moaning about how poorly our teams are playing, and inhaling copious amounts of high-fat foods.

So, as we make plans for the big game and entertaining guests we have to contemplate what decadent, artery clogging, coronary causing, appetizers are to be served. Now I know for several of you that usually involves wheeling the cart through the frozen food aisle of the neighbourhood grocery store, or worse still, paying a visit to one of those convenience stores, where the cooking has already been done for you, leaving you to simply reheat the items come game day.

Others choose to open up a bag of tortillas and drown them in cheese, fire them in the oven or even the microwave and serve them with some store-bought salsa. If that’s your choice then it’s fine by me, but it doesn’t have to be that way.

With a little bit of effort and a little extra time you can make some unique and tasty dishes without spending hours in the kitchen, while still clogging arteries and having your guests reaching for their heartburn medication. This week I share with you two of my favourite snacking dishes to enjoy with friends while watching the game. The first is arguably the best spinach and artichoke dip ever. It was a recipe that we developed upon opening LUX Steakhouse some eight years ago, and to this day I salivate when it hits the table. It requires a little bit of work in preparation, but can almost all be done prior to your friends arriving. The second is a more recent addition to our menu at Century Grill and it is the ultimate in indulgence, sure to leave you wanting more. Oh, and did I mention it’s extremely simple to make? I hope you enjoy them as much as I do, and may your team to lead you to the Promised Land this year, but if they don’t, at least you ate well along the way!

Spinach & Artichoke Dip

Prep Time: 30 minutes

Cooking Time: 10 minutes

Feeds: 10-12 people

Serve with: fresh tortilla chips, crostinis, or torn up French bread

Recommended tools: food processor

1 green pepper, chopped medium dice

1 red pepper, chopped medium dice

½ red onion, chopped medium dice

1 4 oz. can good quality artichokes, drained, quartered

1 lb. fresh spinach, blanched, drained (you can sub frozen)

750 gr. cream cheese

1 cup mayonnaise

¼ cup grated parmesan

1 Tbsp. minced garlic

1 Tbsp. Lea & Perrins

1 tsp. Tabasco

Salt and pepper to taste

If using fresh spinach, place a medium pot of water on the stove to boil, if using frozen, defrost spinach and squeeze all water from the spinach

Prepare an ice bath in a large bowl

Once the water boils, season with salt, place the spinach in the water and stir to cook, allow to cook no more than 1 minute, drain and immediately place in the ice bath to stop the cooking

Drain the cooled spinach and squeeze to remove all water

In the food processor puree the cream cheese, adding the mayo, minced garlic, Lea & Perrins and Tabasco

Then add the spinach and pulse to puree

Add the remaining ingredients and pulse to combine, season to taste

Place in one or several heat proof containers and refrigerate

When ready to serve, preheat the oven to 425F and then place in the oven, cook until simmering and lightly browned on the surface, about 8-10 minutes

Serve with tortilla chips or French bread

Drunken Bread aka Lazy Man’s Fondue

Prep Time: 10 minutes

Cooking Time: 15 minutes

Feeds: 10-12 people

1 loaf French bread, day old works good, large dice

¼ cup white wine

¼ cup melted butter

2 Tbsp. minced garlic

2 Tbsp. minced shallots

1 Tbsp. chopped parsley

¼ cup parmesan, grated

½ Tbsp. dried oregano

Salt and pepper to taste

2 oz aged white cheddar, grated

6 oz. provolone, grated

In a large bowl combine cubed French bread, white wine, melted butter, minced garlic, minced shallots, parsley, oregano, and parmesan

Mix thoroughly to combine, season to taste

Combine the aged cheddar and provolone in a bowl and mix

Using a large heat proof container, lightly layer the bottom with a sprinkling of the cheese mix

Then add about half of the bread, sprinkle more cheese on

Then add the remaining bread and top with all of the remaining cheese

When ready to serve, preheat the oven to 450F

Bake in the oven until golden brown and all of the cheese is melted, about 12-15 minutes

Enjoy this dish and watch it disappear!

Who’s hungry?


Save Your Next Dinner Party From Disaster

Saturday, September 7

As the days of summer wind down and we get back to facing the doldrums of daily life, with the kids back to school, the leaves turning and no vacations in sight we have little to look forward to. Don’t fret, it’s not all bad news. With the arrival of the fall and winter season we still have dinner parties to look forward to. There is something pleasant about inviting three or four of our closest couples over for dinner. It almost feels like a mini vacation, a small break from reality to help us cope with the mundane routines of our lives.

Sadly, for many, with that pleasure there also comes the anxiety of, well, making dinner. After all, it’s difficult to host a dinner party without dinner. It never ceases to amaze me how many friends I meet that tell me they are so intimidated to have us over for dinner because I’m a chef. So, with that in mind, here are a few suggestions I can share to help put your mind at ease and hopefully make your next dinner party a success.

1) Relax — it’s just food!

I see so many people get completely stressed out over making things perfect and flawless, but the truth is that something is likely to go wrong at a dinner party. Want a little more truth? Your guests likely won’t care. They are there to enjoy time with friends, not to critique their dining experience. I’m a chef and things don’t always go perfectly at my dinner parties, but to date no one has just gotten up and left, so….relax!

2) Keep it simple

The night you invite your friends over isn’t the night to attempt your first consommé or soufflé. Don’t get me wrong, serving a box of KD with ketchup probably isn’t going to cut it either, but try to pick a dish that you have at least attempted before, and have an idea of how to prepare. There is nothing more stressful than attempting to prepare a hollandaise for the first time and having it split right as you are about to serve your guests. So as you plan your menu keep your abilities in mind and consider how much can be prepared in advance and how much will have to be finished a la minute or right at dinnertime.

3) Have a plan

The best way to help you relax during your event is to have a clear plan of what you need to accomplish. Once you have a menu it’s important to write a detailed grocery list. Think of everything you may need, spices, garnish, ice, mix, limes, you name it. Your life will be that much easier if you only have to make one trip out for supplies. With the exception of really perishable items like fresh baked bread, it’s also a good idea to pick these ingredients up a day or two prior to the big day. That way you aren’t driving all over town to find that one ingredient on the day of your event, eating into your valuable time. Then put together a task list of what you need to do.

4) Prioritize

Once you have your groceries, prioritize what needs to be accomplished and tackle the most difficult and time consuming tasks early on. Look for items that can even be prepared a day or two in advance without sacrificing quality. Even the little things can make the difference. If you are serving mashed potatoes, there is nothing wrong with peeling the potatoes the day before and storing them in water, for example. Every little bit of time you can save during the big day, the better.

5) Prepare a Signature Cocktail

This is a trick that I have found really handy lately. If I have a group of guests coming over I put together a pitcher of a really tasty cocktail that no one can resist. So when my guests arrive I simply have to pour, rather than turn into Tom Cruise from Cocktail and whip everybody up something unique. Those that don’t want to try your drink will likely settle for a glass of wine or a cold beer.

6) Pick up Dessert

This may seem a little crazy, but unless you’re a pastry chef in your spare time, or have an incredible dessert that is a surefire winner, save the baking for the professionals. Find a great pastry shop in your neighbourhood and let them tire over a decadent seven-layer cake rather than you trying to. Often it is the dessert or pastry that requires the largest time commitment, and so often your guests are too full to enjoy it, or more focused on the libations of the evening to partake in sweets. All that work you spent could have been saved!

Now let me share one last tip to keep in mind while planning your next dinner party. Try to put together a menu that allows you to relax and actually take part in the evening. Unless I am mistaken, I would imagine your guests would much rather enjoy your company than stare at the back of your end as you slave over a hot stove. And if it all goes sideways, don’t sweat it, order a pizza and have another drink!

For some great inspiration for dinner and cocktails for your next event check out my website at www.chefpaulshufelt.com